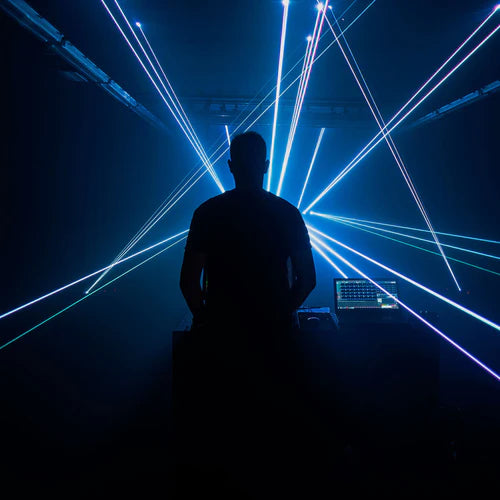
Introduction & Insight

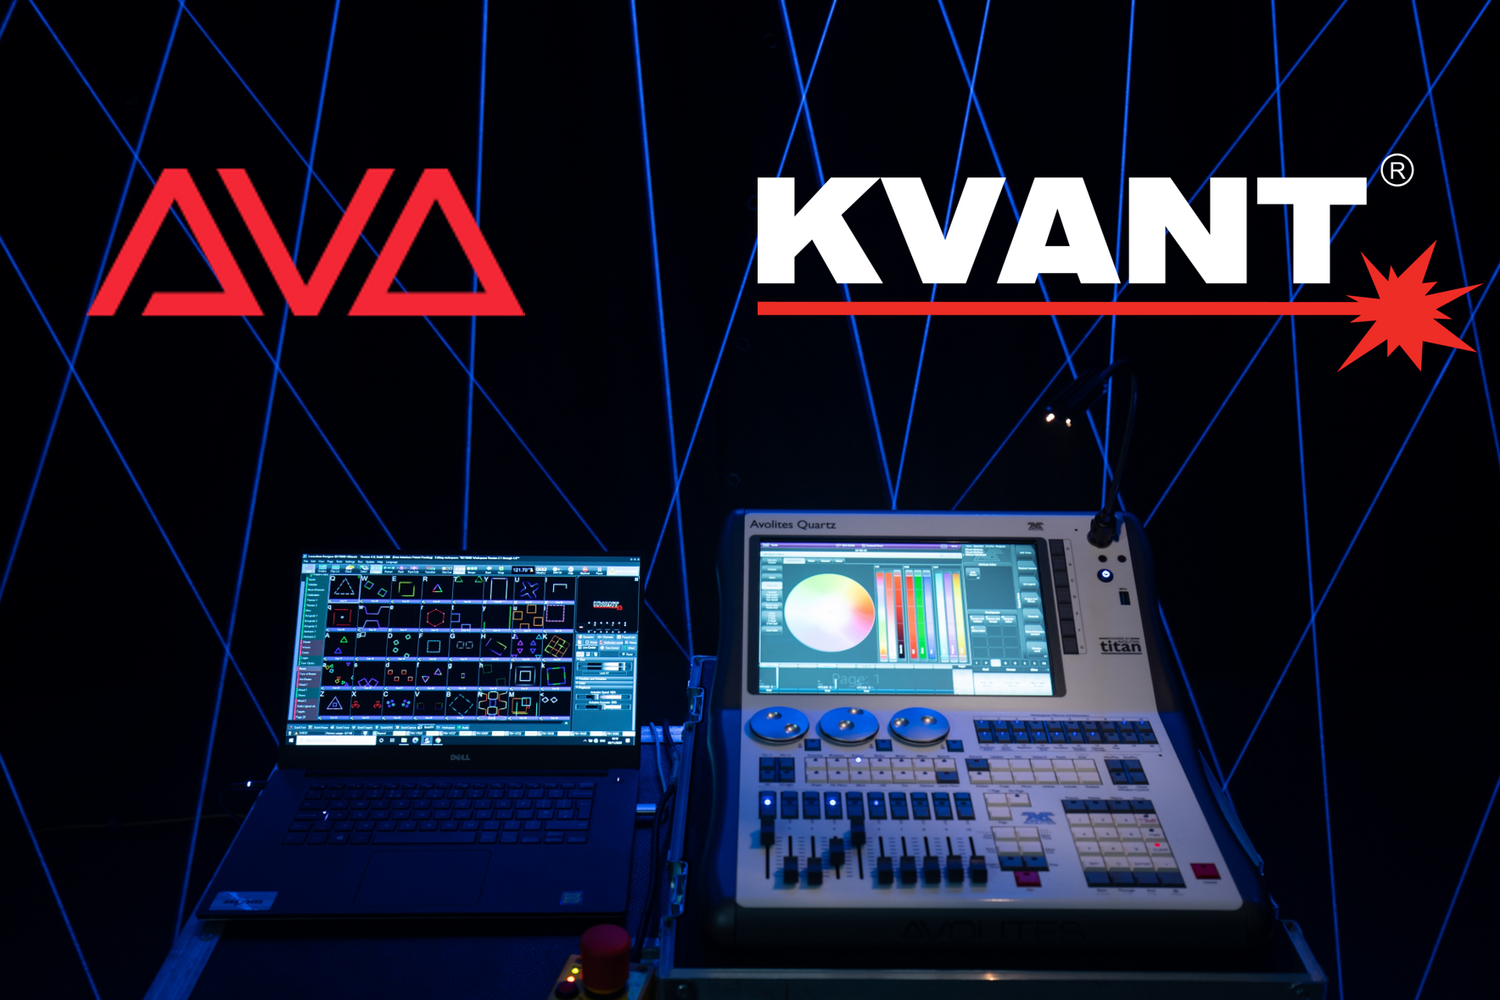
Controlling Professional Lasers directly via a professional Lighting Desk with no software linking the two, has often been portrayed as complicated and even avoided sometimes. We show you how to grab control of FB4 Lasers directly via an Avolites Quartz in a short series or steps & videos. With recent advances in control abilities, personality updates and a great laser content pack V1.0 from our friends Pangolin, gaining control of a small to large FB4 Laser system via ArtNet or DMX is simple and won’t take as long as you might think. All our FB4 Show Lasers in the range can be controlled via a professional lighting console, this includes the Clubmax Series, NEW Unity Finest Entry Level Systems, Burstberry & the Big Brother Spectrum Series.
At Kvant Lasers UK we have worked closely with Avolites here in the UK to develop an updated fixture personality that we know works great for both Laser Users & Avolites Users alike, taking in feature requests from both sides of the industry to ensure it can be achieved from a skilled user level on the consoles to a newcomer to a Avolites desk, this ensures everyone feels at home and understands lasers can be made simple to use with Native control. We are thankful for the continued support from the Avolites team for updates & Pangolins Great Content Pack, with this support we are making laser control the best it can be direct from a lighting desk, which we call Native Control. We thank Steve Warren and his great Avolites team for their continued support with this project & Pangolin Laser Systems and their team for the Content Pack, Software Support & Online Training Material.
During this insight into Avolites Laser Lighting Desk Control, we go through step by step of how to get started, program and ultimately produce a laser show for your next event from native console control. You can read our PDF Guide for download below and watch our video which gives a visual & hands on detail of how to get to each step of the process.
Please note parts of our video series have been filmed prior to the release of the AvoKey which allows v12 of the Titan Software. This has been filmed on the version of Titan before v12.
VIDEO Tutorials:
Learn Laser Lighting desk control here!
STEP-BY-STEP INSTRUCTIONS
[PDF INSTRUCTIONS DOWNLOAD]
Step 1
Content
Let us get started, this might sound strange. But the first steps are away from the Lighting Console. We first need to make sure that the FB4 or FB4’S you are using have the DMX content pack & Test Patterns readily installed. If you are using a Kvant Laser Projector with FB4 purchased in 2020 or later, it is likely this content is already installed. But you can still follow these steps to make sure that it is there or not.We now go to File – FB4 Export – Upload Content Pack – Select what pack you would like to upload – Select FB4 Hardware – View in FB4 Browser the content uploading. Do not disconnect the laser setup until this has completed. The more projectors that are in the system, the longer it will take to upload.
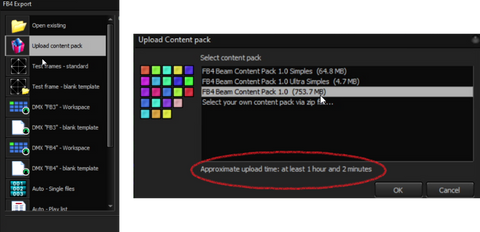
In FB4 Browser, under each FB4/Projector – check in content that you have Test Patterns content files present. If you do not follow this process – File – FB4 Export – Test Patterns Standard – Upload. It is important that we have these on the laser, if we do not. We will not be able to easily set a safety zone or test patterns using the Lighting Desk.

For uploading your own custom content, this follows similar steps. Create your cues in Quickshow or Beyond. File – FB4 Export - DMX FB4 Workspace – Choose which cue you would like to be what DMX Value – Upload to chosen FB4’S. This step is now complete, and we move onto the Lasers & Lighting desk, you can now unplug the Laser Software if you are setting DMX or ArtNet Addresses on the laser locally.
You can watch Pangolins in depth video guide here to uploading for additional help.
Step 2
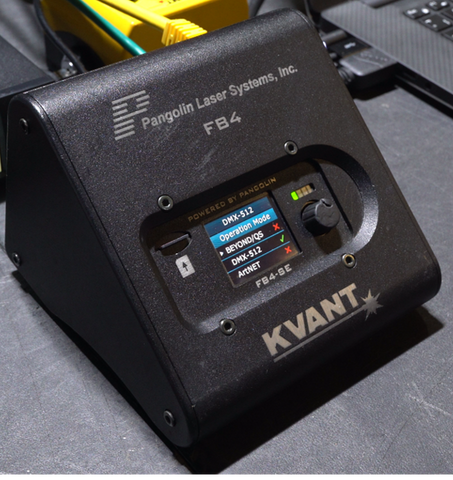
Getting Control from your Avolites Desk to your Kvant Laser via FB4
So we now choose if we want to control our FB4 Lasers from the Avolites Lighting console via ArtNet or DMX.For DMX control, we set the FB4 to DMX Mode, then to the correct starting channel and 39 channel mode (FB4 Mode). Once done connect the 5 Pin data Cable from the lighting desk or buffer to the laser.


Step 3
Patching your Kvant FB4 Laser to the Lighting Desk
First we need to make sure Titan software on the desk is running the latest personality build, you can download the latest version from Avolites here - https://personalities.avolites.com/
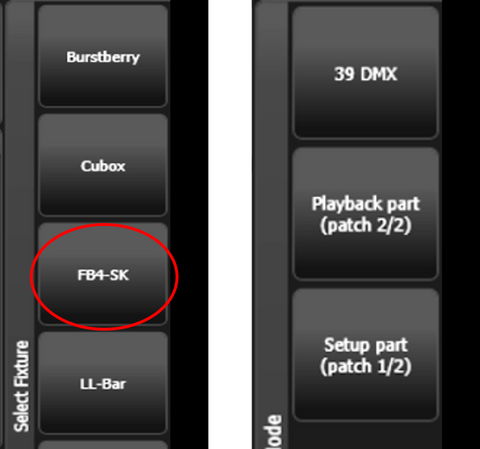
The next process is patching the Playback & Setup part of each laser (if separate addresses). If you have the lasers all on the same address. You will only need to do one playback and setup process.
Keystrokes are – Patch – Fixtures – Kvant – FB4 SK – Setup Patch 1 of 2 & Then the same process again and Playback Patch 2 of 2. You can click exit after patching setup to easily go back to patch Playback. It is important that we do setup Patch first or the personality will not work correctly. You can set fixture Legends, so you know which fixture selects are Setups & Playbacks.
You can also patch the 39CH combined playback and setup personality if you feel more comfortable with it. But we recommend keeping the setup and playback part separate so programming mistakes cannot happen.
Now we make sure the starting address and universes are correct as required, the lasers match up with the control desk patch. One checked we can begin the safety zone and modes setup.
If you are using DMX Protocol, make sure you are outputting to the correct line or universe out of the desk. If you are using ArtNet Protocol, please make sure the laser fixture is connected as a FB4 node in DMX Settings. We explain connecting via ArtNet more in depth on our tutorial video.

Select the Setup Fixture – Attribute editor – Min/Max – Mode. Here we are going to record our Blackout, Setup & Playback mode recalls onto a Macro/Execute button for easy ways of getting into the modes. You can put setup further away from the other two buttons as this will not be needed as much in the live show. Select each mode – record – then onto the chosen recall button. This makes it easy to see at any one-time which mode you are currently working in as only one handle light should be on. Do not record these modes onto faders as it has the potential to cause issues if the fader is setup to fade through the values.

Now we have set this up, let us discuss laser safety. Before outputting laser emission make sure where you are pointing the laser out too is safe to do so, free of audience and public spectators and is not going to cause harm to anyone. We recommend going on a Laser Safety Course by LVR Optical if you are wanting more training in the safe use of Lasers - https://www.lvroptical.com/.

Once you are happy to start emitting laser light, we go to Setup – Max Intensity – 20% - Test Frames and select one, test frame 1 is the most commonly used. Go to MAX Width etc… tab in attribute editor. Here we can set our max width and max height with the encoders. Here we make sure and control where the lasers are pointing and program them into the desired position. Max Horizontal and Vertical may be used if the output image appears squashed. We can also use Max Angle to rotate the output test pattern if needed for a certain effect. Once done, let’s freeze these parameters on this page.


Two important notes here:
Being different from a normal moving head or led fixture, locate will not output laser light. This is for safety, so you do not accidentally put them on by mistake. It will reset other necessary attributes back to locate values. For Burstberry ArtNet Laser fixtures, it will locate the LED Blinder module built in. We discuss Burstberry Laser functions more at the end of this tutorial.


Step 4
Playback functions and how to get Laser Content out for your show
At this point, we merge Laser programming speak and Avolites programming words. So a user who is new to Lasers but understands Avolites Titan Software very well, is more than at home for programming a stunning laser show and a Laser user who has come from Pangolin Beyond or Quickshow understands the same principles and ways of outputting and programming a laser show.
Go into Playback mode - Special - Scan Rate - Change 15K to 30K, select Blue Button under encoder then freeze. You can change this attribute to suit your laser projector specs and abilities.

Now the programming fun begins, we can start to treat the Laser as a normal lighting fixture in the way we programme on a Avolites Quartz running Titan Software.
We locate our intensity value to 100%, select content – content pack – Simples – Select a content image to output. Now we have laser output from the laser, it is great! Thumbnails show you what the content is before outputting.

You can also check out what the content looks like on Pangolin's video series here:
Simples
Complex (Full Pack)
If you are using your own content, simply select user – page and cue index to what you have exported your laser programmed content out at from Beyond or Quickshow laser creation software.


Step 5
Exploring the different attribute tabs on the Avolites Titan Software
With being in playback mode and intensity at full, we are now going to explore the full benefit of Lighting desk control of Kvant Lasers with FB4.
Position – Here we can move around the laser animation within the safety zone created in setup, this can be useful for targeting a graphic in a certain location. This tool is useful but be careful not to squish laser effects to one corner too much as this does output as a flattened image in one direction, especially circle effects.
Alpha – This Editor allows us either to Use the original Content Pack/User Cues colour, Override with the lighting desk RGB Colour Wheel mixer or have a mixture of both with a value of 0-255 (shows as 0-100%).
Colour Mix – When the above editor is in RGB Desk Mode, this area allows you to select multiple colours.
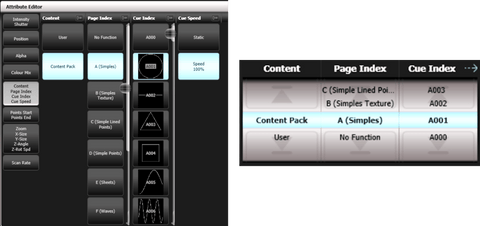
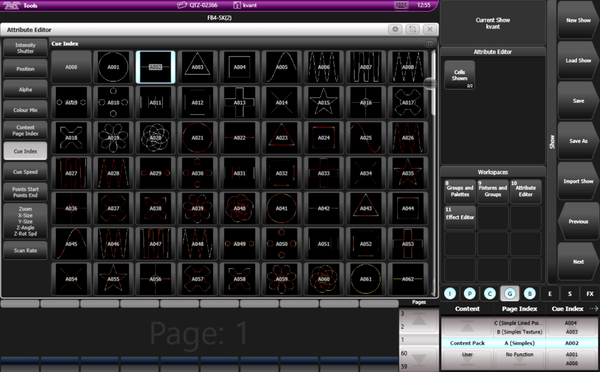
Content (Laser Gobos) – We have covered this in the last step, but for easy clarification Content Pack cues are what come with new Kvant Lasers with FB4 and you can upload the content pack as well as explained previously in this post, you can also upload your own cues to the lasers and direct to them by knowing the page index number and cue index (DMX value between 1 – 255) 255 Cues allowed per page.
Cue Speed – Speed 100% will be your neutral position; the speed cues are exported from Beyond or Quickshow. – You can either raise the speed or slow it down, with some cues it is not possible to stop the speed of the cue, but only slow it down to a very slow movement.
Points Start & End – This editor is useful for reducing an image or taking parts of the animation away. For example say you had a 6 spread finger beam laser animation emitting, but you wanted to quickly wanted just a 3 beam effect, you can use this tool to achieve that by reducing the values.
Zoom, Size, Angle & Rot Speed – This is the section where we can really manipulate and change a live image, zooming for example a circle from wide to a pinpoint is an effect easily done. Size, here you can set multiple ‘zones’ within the laser safety zone already done in setup. So, for one cue you could have the animation top left then another some beams bottom right. You can also set an angle of the output of your choice Positioning your show cue where and how you like it! Rotate speed, this corresponds to z-angle. You can change the direction of a cue and speed of it spinning, try projecting a line with a zoom chase & Z Angle Spin. The effects are great.
Step 6
Shape Generator and it’s endless creative laser possibilities
Avolites is a leading Lighting Desk & Software brand that is industry known around the world. The Shape Generator included in Titan Matched with Kvant Lasers running FB4 helps you take already animation perfect images and adds a whole new dimension to them. Here we discuss over each attribute what Shape Generator can do for you and more.
Dimmer – Dimmer Spread, Pulse & Strobe – Think about 6 lasers in a row, perfectly syncing a smooth dimmer chase or upbeat rave strobe cycle.
Pan/Tilt – Normally this would correspond to a Moving Light and its position of its x & y axis. Well we took this and merged it into a concept for lasers. Let’s take a laser circle for example, once we add a circle shape generator, that animation is now going to spin around your projection area in a circle like formation. The possibilities are endless with basic shapes.
Colour – Make sure in Alpha colour attribute editor that you have RGB Console Colour selected, now let’s create some colour fun. Here we can change colour and do colour effect. This changes the overall colour of an animation. But this spread over several lasers doing different colours adds to your creative line up of show cues.
Beam (Zoom) – We can add zoom to the shape generator to do interesting tunnel and incoming abstract effects, have a play and see how unique you can make your next level show.

Additional DMX Control Channels For Burstberry FB4 Laser System
As promised earlier in this Lighting Desk Laser Control tutorial, we are now going to show you how to grab control of the additional blinder & diffraction grating channels on Burstberrys direct over ArtNet.
The only difference is the personality on Avolites Patching has additional 4 channels allocated for the added features.
First we are going to make sure we have the Burstberrys FB4 enabled to route DMX out of it’s serial port. We show you how to do this via Beyond & Quickshow.
For Beyond we go – File – FB4 Settings – Make Sure all the Lasers are Connected to Beyond – Projector Settings – FB4 Serial Port (Change Every Unit) – Enable Serial Port – Set Addressing as required. We have a setup of 4 fixtures for individual control starting at Base Address 1. It’s important to understand that this does not correspond to your Lasers DMX Address, this is just for the Laser to understand when to use Blinder & Diffraction worked out by the FB4.
Unit 1 – Base Address 1 – Number of Channels 4
Unit 2 – Base Address 5 – Number of Channels 4
Unit 3 – Base Address 9 – Number of Channels 4
Unit 4 – Base Address 13 – Number of Channels 4
Click OK, this has now been saved to the Burstberrys Laser FB4.

Now we go back to FB4 settings and change all our units back to ArtNet Mode. You can do this directly onto the laser itself, but if you have many fixtures this makes it quick and simple without having to leave your chair.
For Quickshow – Load Quickshow – FB4 Settings and change to QS/Beyond Mode – Then Ensure all Lasers are connected. In Future versions of Quickshow it is expected you will be able to do the same process as Beyond for enabling DMX Serial Port. But for the moment this is the current method.
File – FB4 Browser – Settings File – Double Click – Save this to a suitable location – (You will have to do this one by one) – Now find this file on your computer – Open it in notes - DMX Patch & DMX Patch Length. Change this to suit your setup, the same as you would in Beyond. We have used these addresses in the address allocation above.


Now we go back onto Quickshow after saving and closing the notes settings file. Click upload on the File Viewer and replace the current Settings File with the new updated. You will have to do this with every fixture for the moment. Change back to ArtNet mode for the Lasers.
Let’s move onto the Avolites Lighting Desk, we now do as we would with the standard FB4 by patching two parts. But this time we patch the Burstberry FB4 personality.
Now we gain control exactly the same as earlier in this tutorial, including setting the nodes, setting modes, safety zone and freeing. Please refer to this part again if you are stuck.
Select the playback fixture of the laser, you will now see we have 3 selects above Intensity when we enter the attribute editor. We either control the blinder and laser together, or individually. This is most helpful when we are using the shape generator, so we tell the desk what output we want controlled.

To get output from the Blinder & Grating wheel we do the following – Intensity – Attribute Editor – LED – Then scroll the encoder up to 100% - You now have a nice warm white blinder.

For the grating – It’s important to understand that we must output laser content for the grating to work correctly. So, for example we output a white circle. It will split it into it’s 3 native colours. If we do a cyan output, we are only going to get Blue & Green grating and of course we can do individual colours. Have a play with the colour mix while in Alpha selection to get the full potential of colour mixing with the grating.
Go to Special – Attribute Editor – Here we have 3 selections – Enable (drop in) the grating with turning ON, then we control speed and direction.


The Conclusion
You have an easy way of controlling stunning laser shows for your next event!
Now you have control of your laser system either through ArtNet or DMX and the creative potential through your programming and the content pack is next level.
Here are our last pointers to help you out during the programming session.
- When the FB4 Is in setup mode there will be a two second delay toggling between Playback and Setup.
- If a BPM based Effects are exported at 100BPM and you want to have a cue running at 128 BPM, change the speed to 128 DMX Value.
- Lowering the scan rate can impact the cue speed of the laser.
- FB4 Indicators on your Laser – When you have a solid data connection the third light on your FB4 will blink orange. During setup, the red light on the FB4 (Fourth Light In) will blink. During Playback Mode, the red light will shine continuously.
- Use the shape generator with all its programming power, we love it and it gives you, the user - more effects that can be unique every time you use the Avolites lighting desk with Kvant FB4 Lasers.
Are you Interested in more information about our Professional Show Laser Systems controlled via ArtNet & DMX with Avolites?
We have a dedicated demo studio here at our office here at Kvant Lasers UK, as well as being filled with the latest Kvant Laser Show Systems, you can also try out and realize the potential by controlling Lasers direct from an Avolites Quartz with no software linking the two. Just direct control, which we call Native Control! Let us show you the latest innovation in control with expert training knowledge - Book an appointment with us at info@kvantlasers.co.uk.


